 Home
Home Help Center
 Support
 Print
Print Feedback
You are here: Getting Started > Tutorials > Tutorial 3: Building advanced forms and workflows > T3-14. Use custom controls in InfoPath (Advanced)
Tutorial 3—Step 14: Use custom controls in InfoPath (Advanced)
Tutorial 3: Building an advanced from and workflow
- Build a form in InfoPath
- Add and change swimlanes
- Create a starting workflow
- Publish the form
- Create an intermediate workflow
- Create Manager and HR form views
- Add functions for form logic
- Create an advanced workflow
- Create a SharePoint list and data connection
- Use transitions and promote fields
- Publish Transaction script as a Web service
- Add custom controls to InfoPath
- Configure custom controls in InfoPath
- Configure custom controls in InfoPath (advanced)
In this exercise you will continue working with the following custom controls (added in previous exercises) in InfoPath:
- WS.CurrentUser
- WS.ProcessControl
- WS.FormValidation
- Launch Winshuttle Designer and open the file from the previous exercise.
- Click Launch InfoPath.
- Insert the following controls into your form (placement does not matter.)
- WS.CurrentUser
- WS.ProcessControl
- WS.FormValidation
Note: Previous versions of Winshuttle form controls were named Sharevis.Studio. (For example: ShareVis.CurrentUser.)
- Add the following text boxes to your form and rename them:
Place these text boxes inside of a table (just like it is below) and put them towards the top of the form.
Text Box Name
Field Name
Full Name
FullName
Email
Email
Telephone Number
Telephone
Username
Username
- Right click the WS.CurrentUser control, and then select WS.CurrentUser Properties
Select Current User Info to configure the control.
- In the Full Name XPath: field, insert the Field Name for your Full Name text box on your form.
- In the User Name XPath: field, insert the Field Name for your Username text box on your form.
- In the Email XPath: field, insert the Field Name for your Email text box on your form.
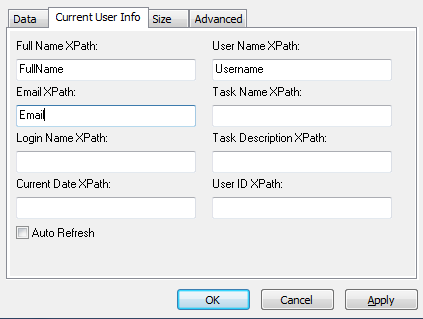
- Click OK.
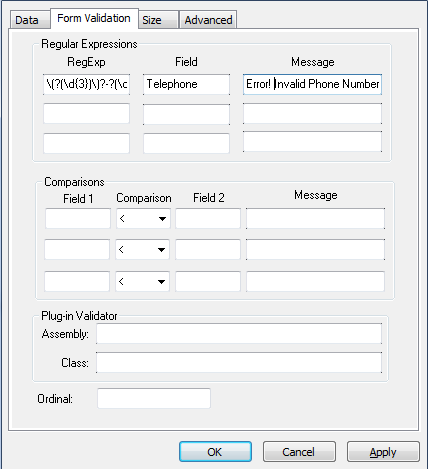
- Right-click the WS.FormValidation control, and then select WS.FormValidation Properties.
|
|
This completes Tutorial 3.
 Trademarks