 Home
Home Help Center
 Support
 Print
Print Feedback
You are here: Getting Started > Tutorials > Tutorial 3: Building advanced forms and workflows > T3-8. Create an advanced workflow
Tutorial 3–Step 8: Create an advanced workflow
Tutorial 3: Building an advanced from and workflow
- Build a form in InfoPath
- Add and change swimlanes
- Create a starting workflow
- Publish the form
- Create an intermediate workflow
- Create Manager and HR form views
- Add functions for form logic
- Create an advanced workflow
- Create a SharePoint list and data connection
- Use transitions and promote fields
- Publish Transaction script as a Web service
- Add custom controls to InfoPath
- Configure custom controls in InfoPath
- Configure custom controls in InfoPath (advanced)
In this tutorial you will:
- Integrate a form with a workflow.
- Route the form based off form data.
- Add an approval loop.
- Open Winshuttle Designer, and then open the Time Off Request solution.
- Publish the form Time Off Request for the updated form information to become available.
- Select and delete both of the Approval Nodes, the Notification Node, and both End Nodes.
- Insert the Loop Nodes into the Manager and HR swimlanes.
- Rename the Loop Nodes to "Manager Approval Loop" and "HR Approval Loop." (respectively).
- Double-click the Manager Approval Loop node.
- Duplicate the workflow shown below:

Make sure that you rename the Approval Node to Manager Approval.
- Navigate back to the Time Off Request tab, and then double-click the HR Approval Loop Node.
- Duplicate the workflow shown below:
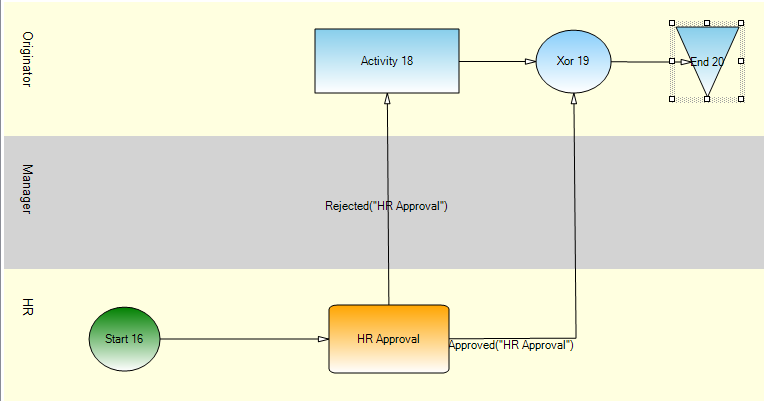
Make sure that you rename the Approval Node to HR Approval.
- Navigate back to the Time Off Request tab.
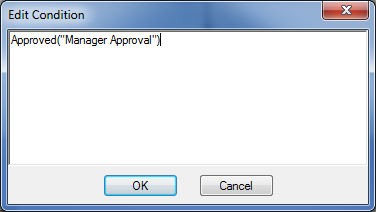
- Click the Manager ApprovalLoop node to select it.
- In the Properties pane, under Loop, select Loop Type, and thenselect Repeat UnitCond from the drop down menu.

- Click the Edit Condition button to edit the condition in which the workflow will exit the loop.
- Insert the following: text Approved("Manager Approval"), and then click OK.
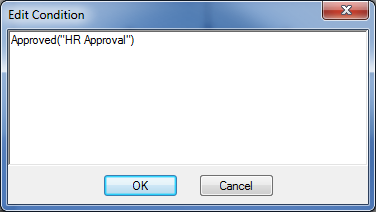
- Click the HR Approval Loop node to select it.
- In the Properties pane, under Loop, select Loop Type, and then select UnitCond from the drop down menu.
- Click the Edit Condition to edit the condition in which the workflow will exit the loop.
- Insert the following text Approved("HR Approval") and then click OK.
- Save and publish your workflow.
 Trademarks