 Home
Home Help Center
 Support
 Print
Print Feedback
You are here: Getting Started > Tutorials > Tutorial 3: Building advanced forms and workflows > T3-5. Create an intermediate workflow
Tutorial 3–Step 5: Building an intermediate workflow
Tutorial 3: Building an advanced from and workflow
- Build a form in InfoPath
- Add and change swimlanes
- Create a starting workflow
- Publish the form
- Create an intermediate workflow
- Create Manager and HR form views
- Add functions for form logic
- Create an advanced workflow
- Create a SharePoint list and data connection
- Use transitions and promote fields
- Publish Transaction script as a Web service
- Add custom controls to InfoPath
- Configure custom controls in InfoPath
- Configure custom controls in InfoPath (advanced)
In this part of the tutorial, you will create a more advanced workflow using form data, and gain an understanding of the approval process.
- Open Winshuttle Designer, and then open the Time Off Request workflow from Tutorial 1.
- Select the Start Node and press and hold Ctrl and press the Delete key.
- Select the End Node and press and hold Ctrl and press the Delete key.
You should now have a blank canvas.
- Insert the Start Node into the Originator swimlane.
- Insert an Approval Node into the Manager Swimlane.
- Insert an Approval Node into the HR swimlane.
- Insert a Notification Node and 2 End Nodes in the Originator swimlane.
- Make the following transitions as shown in the figure below:
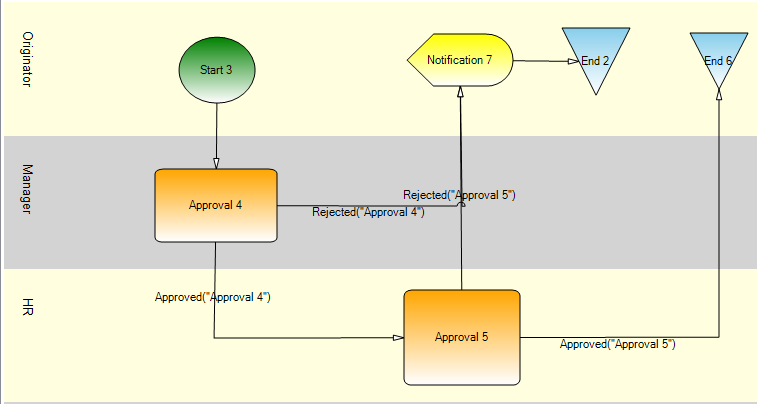
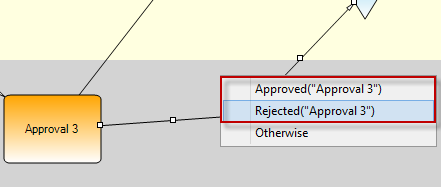
Note: Insure that you have both Approved and Rejected transitions for each Approval Node. To create the Approved and Rejected Transitions, right click on the transition and select either Approved or Rejected.
 Trademarks