Applies to:
Winshuttle Central Query/Transaction menu: Application Servers
Back to
Transaction menu topics
Use the Application Servers page to:
- Add SAP servers to your Winshuttle Central environment to facilitate communication between Winshuttle desktop clients and the SAP server via Winshuttle Central.
- Remove SAP servers from your Winshuttle Central environment.
There are two server types:
- Production Servers: Production servers are servers that run approved files.
- Non-Production Servers: Non-production servers are development servers where files reside that have not yet been approved, or where development scripts are tested.
Adding SAP application servers
Back to topTo add an SAP Application Server, do the following:
- Open the Winshuttle Central Administration page.
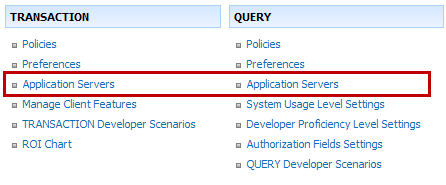
- Under TRANSACTION or QUERY , click Application Servers.

- Click Add, and then click AddServer

- Enter the appropriate information in the following fields:
- SAP system ID
- Client
- Server type (production/non-production)
- Description of the server

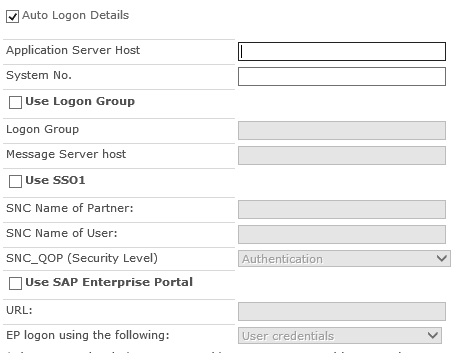
- To configure auto logon, check Auto Logon Details, and then fill in the following information (values shown below are just examples):

- Add the application server host address and the system number.
- To use a logon group, check Use Logon Group. Enter Logon Group and Message Server Host Details.
- To use SSO (single sign on), check Use SS01. Enter the SNC Name of Partner and SNC_QOP and SNC Name of the User. (An example is shown below):

Note: See Configuring SAP SSO for more information about configuring Single Sign-On.
- Select the appropriate SNC_QOP (Security Level) from the drop menu.
- To use SAP enterprise portal, check Use SAP Enterprise Portal. Select the URL and EP logon from the drop down.
- After filling all the required details, click Save.
- Repeat this procedure for each server that needs to be added.
Deleting SAP application servers
Back to top- Open the Winshuttle Central Administration page.
- Click WinshuttleCentral Administration.
- Click Application Servers.
- Click the server name.

- Click Delete.
