Applies to:
- Winshuttle Foundation
Working with rules
Related Topics
On this page
- Rule actions
- Adding a new rule
- Changing or deleting rules
- Using the Rules Inspector
- Working with conditions
Rules are powerful tools that control logic and help automate functions within a form, such as updating one field automatically when data in another field is changed. Rules can apply formulas to data, change data, and change the appearance of data in a form.
For example, you would use a rule to make a Button trigger a specific function, such as a search against a database, activating a Web service, or setting a field value. You could also use a rule to indicate incorrect data entry by changing a field color to red to indicate an incorrect value.
For Advanced Rules:
If the Composer Rule Wizard does not provide the flexibility required to create a rule, advanced users can create rules using custom JavaScript. See the Composer JavaScript Reference Guide for information about supported JavaScript wrappers, syntax, and more.
Rule actions
Back to topEvery rule can consist of one or more Actions. In the example above, a single rule could be used to handle both functions, each of which would be a separate action. For example, you can use a rule to automatically calculate and update the total price form field based upon values entered by the user in an item price field and a quantity field.
When applying more than one rule to a Field or Button, the following Actions can only be used once and must be the last rule in the sequence:
- Execute Query
- Execute Web Service
- Submit Form
This is because a request is made to the server so no additional rules can be executed once the request has been made.
Tip: Fields with rules applied to them appear with a check icon next to their name in the Solution pane on the Solution tab. For example: ![]()
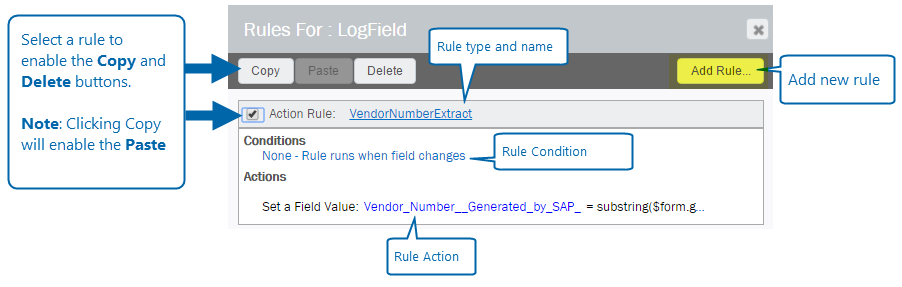
A Composer rule consists of a rule type (Action, Formatting, or Validation), 1 or more Conditions, 1 or more Actions.
Adding a new rule
Back to top- In the Properties pane, click Properties.
- On the Properties tab, next to Rules, click the Options [...] button.
- The Rules Inspector opens in the Properties pane, as shown below.
- Click Add Rule.
- Enter the following information for the rule:
- Label: Type a descriptive name for the rule.
- Run Rule On form Load: Select this to run the rule as soon as the form is loaded.
- Type: Select a Rule Type: Validation, Formatting, or Actions.
- Condition: Click to create the condition(s) for when the rule is triggered, such as when a specific form field changes. See Working with conditions (below) for more information.
- Message: Enter a message to display to the user when the rule is run.
- Use Popup: Check this box to use a popup to display the message to the user.
- Popup Title: If you selected Use Popup, type a name for the popup window in this field.
- Click OK to finish.
Changing or deleting existing rules
Back to topClick in the field or element that has the rule you wish to change.
- In the Properties pane, click Properties.
- On the Properties tab, next to Rules, click the Options [...] button.
- In the Rules Editor:
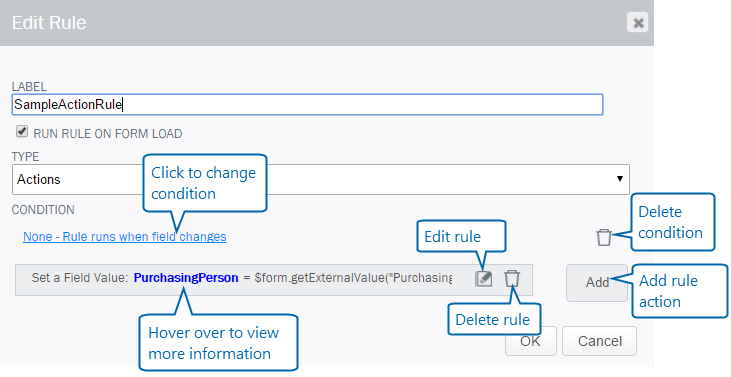
- Click add to add a rule action.
- Click the edit icon to open the rule in the editor.
- Click the delete (trash can) icon to delete the rule.
- Click the condition to change the rule condition. See Working with conditions (below) for more information.
- Click delete condition (the trashcan) to delete a condition.
- Click OK to finish your changes.
Using the Rules Inspector
Use the Rules Inspector to get a snap shot 'dashboard' of all the rules in your solution.
From the Rules Inspector you can:
- Search for specific rules in the search bar to filter results.
- Print the results.
- Edit a rule by clicking its name.
- View all of the rules applied to a field by clicking the name of the field.


Working with Conditions
The Condition Builder provides a simple graphical interface for creating the logic and rules for your condition.
- Click Add Condition to add a condition.
- Click Add Group to add a sub-group of conditions.
- Select Form Fields and logical operators (such as "is equal to" or "not equal to" for example) from the drop down menus.
- Click Delete to delete a condition or group.

Below: A sample condition in the Winshuttle Composer Condition Builder
