Applies to:
- Winshuttle Foundation
6-4 Create a selectable table for search results
Back to
Steps in this phase
On this page
- Create an Address Validation Group
- Create the selectable table from search results
- Create the rules to copy selected rows
- Save and test
In this section we will build a selectable table that will show the user search results, and we will enable the user to select a row from the table that will then replace key information in the address fields in the form.
An easy way to create a Selectable Table (as well as a Repeating Table or Repeating Group) is to drag the field or fields from the Properties pane (under the Form Data tab) to a group in your form.
For this tutorial, we will use this feature to quickly create a Selectable Table for the Address search results.
Overview
First, we will make a Group called Address Correct. This Group will contain a Button called Correct Address and the Selectable Table that will contain search results from our Address lookup service.
Then we will create rules to enable the user to select an address from the search results, click a button, and have the results copied to the vendor address fields in the form.
Create an Address Validation Group
First we will create a group to contain a table and a button.
- In Composer, click the Form tab.

- Click the Originator tab.

- On the ribbon, click New Group.
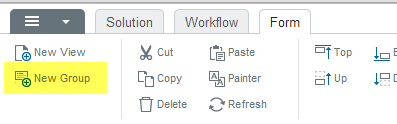
- In the Properties pane, click Elements.
- Under Basic Elements, click Button. (This will be the Validate Address button.)
- In the newly added group, click Group Label (click to edit), and then replace the text with Address Validation (or whatever variation works for you).
- Change the button label: Click the button. In the Properties pane, next to Label, type a new name (Validate Address, for example) for the button.
Create the selectable table from search results
In this step we will drag form fields to the form to create a selectable table, and then we will format the table.
- In the Form tab, in the Properties pane, click Form Data.

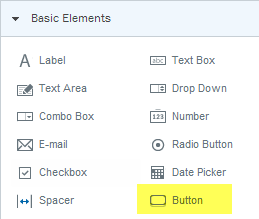
- In the Form Data pane, browse to the Results fields for the data you wish to use to create a selectable table.
For the purposes of this tutorial, we browsed to: MyFields > Address > address-output > results > repeating content > address > repeating content.
- Under Form Data, drag the Repeating Contents folder to the ValidateAddress group created in the previous section.
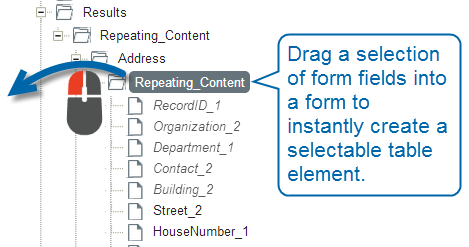
- In the Repeating Elements Option dialog box, click the arrow and then select Selectable Table.
- Click OK. You should now have something resembling the following.

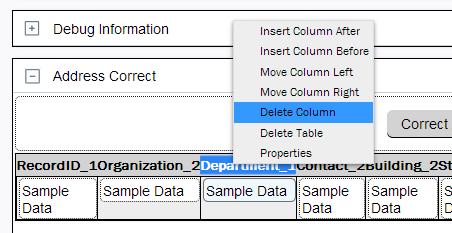
- We don't need all of the fields, so we will remove the ones that are not needed. To remove a column, simply right-click its header, and then click Delete Column.
Remove all of the columns except for those showing necessary data, such as House Number, Postal Code, Province, State, and Country, for example. You may also want to rename the column headers (rename them and/or remove the underscores and numbers) to make the table easier to read.
You should end up with something resembling the example below:

Create the rules to copy selected rows
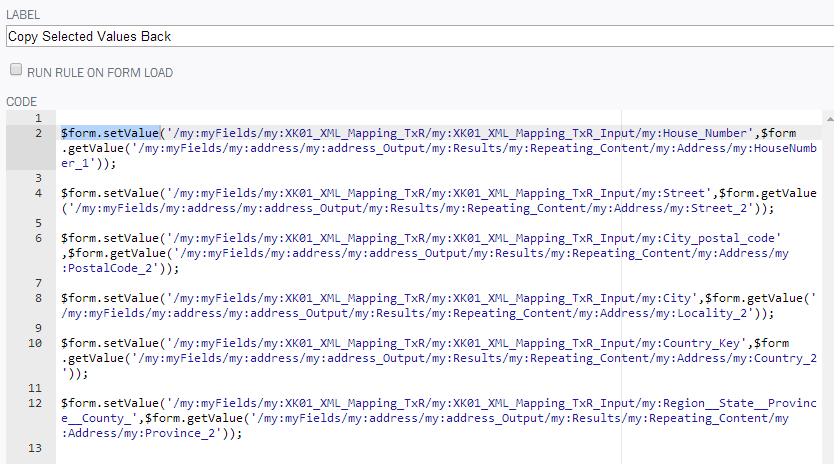
Now we will create a rule with 6 actions to make it all work. This rule will copy a selected row from the address validation results displayed in the selectable table back to the corresponding address fields in the Vendor section of the form.
- Click on any column heading in the Selectable Table.
- In the Properties pane, next to Rules, click the Options [...] button.

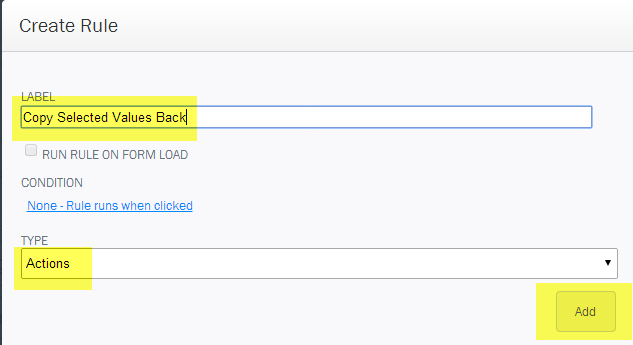
- On the Rules Editor screen, click Add,and then click Rule Wizard.
- On the Create Rule screen, do the following:
- Label: Type a label (name) for your rule. (In this example we use Copy Selected Values Back.)
- Type: Click the arrow, and select Actions from the list.
- Click Add.
- On the Add Rule Action screen, do the following:
- Action: Click the arrow, and then select Set a Field Value from the list.
- Field: Click the arrow, and then select the first field from the Address Validation table (House Number for this example).
- Value: Click F(x).
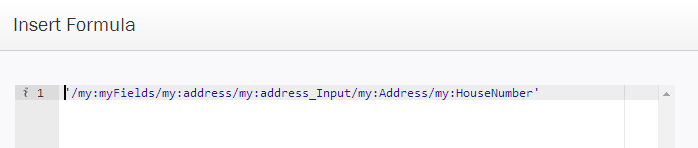
- On the Insert Formula screen, click Insert Field Value.

- Expand Address > Address Input > Address.
- Select House Number_1.
The initial result should look something like this:
- Click in front of the string you just inserted, and type $form.setvalue (.
See the example below:

- Now, click at the end of the string, and then type a comma.Click to insert the cursor just after the comma.

- Click Insert Field Value.
- Browse to the House Number field (again, note that the name may differ slightly than what is shown in the example below). Expand Address > Address Output > Results > Repeating Content > Address > Repeating Content.
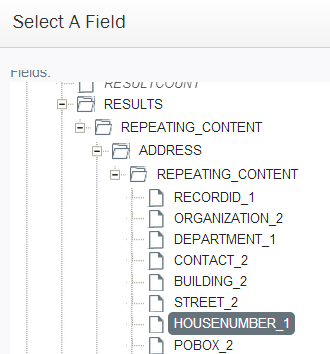
- Click House Number_1.
The end result should look something like this:

- At the very end of the line, add a closing parenthesis and semi-colon. Notice the red (error)
 indicator disappears.
 - The final result should look something like this:

Now, repeat steps 5-15 for each of the remaining fields using the values in the table below. Again, bear in mind that the exact field names might differ slightly (mainly the underscore and the number) depending on your own form, how it is constructed, etc.
|
Input: Set Field Value (step 8) |
Get Value from Repeating Field (step 12) |
|
Street |
Street_2 |
|
City_Postal_Code |
Postal_Code_2 |
|
City |
Locality_2 |
|
Country_Key |
Country_2 |
|
Region_State_Province_Country_ |
Province_2 |
The end result should look something like this:
Save and test
Once you have finished creating your Address Validation section, save and test it in your form.