Applies to:
- Winshuttle Foundation
Copy Form plugin properties
The Copy Form Plugin enables you to copy a specific form view used in a workflow (such as the Completed view, for example) and place a read-only copy in a SharePoint document library, or in a local or network file folder (such as a shared folder on a network server, for example).
The Copy Form plugin also synchronizes values in commonly named SharePoint columns between the source and destination. For example, if you have a column in both your Source and Destination with the exact same name, the values will automatically be updated.) The copied file is stored with *.MHT file extension.
On this page
- Copy Form plugin usage example
- How to use the Copy Form plugin
- Copy Form plugin tips and best practices
- Copy Form plugin parameters table
Copy Form plugin usage example
A company wants to store approved forms with the signature of the approver(s)in one location, and store rejected forms a different location for future auditing purposes.
How to use the Copy Form plugin
- [Optional] Create a SharePoint document library if you plan to use one to store the attachments. (For this example we use a SharePoint document library, but you could potentially use any accessible folder on a local or network PC.)
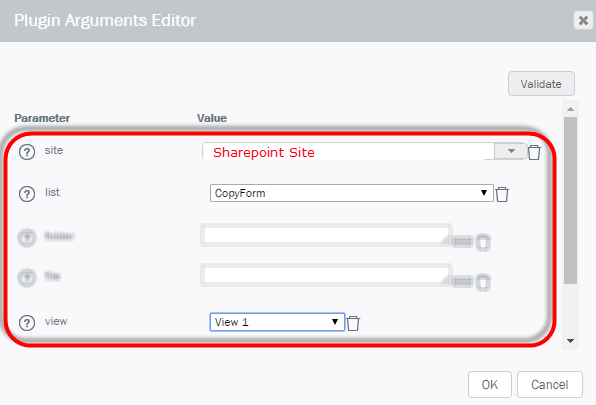
In this example, we use a document library named CopyForm located on a SharePoint site named SharePoint Site.
- In Composer, click the Workflow tab, and then add a new Plug-in Action.

- In the workflow, add (i.e. click and drag to 'draw') a Plugin Action node to the Workflow.
- Click the newly created node. In the Properties pane, in the Action section, locate the Plugin name field.
- Select the Copy Form plugin.

- Click Plugin Parameters

- Set the Site field to your SharePoint site. In this example, we're using Sharepoint Site as the name of our sample SharePoint site.
- In the List field, locate the SharePoint document library you wish to use. (We would select CopyForm because that is the name of the document library being used in this example.)
NOTE: For site and list parameters, enter the site first. The list will then be populated in the dropdown. - Next to View, select the View from the drop down list.
- Click Validate. (You should see the message "Validation Complete. No Errors found.")

Copy Form plugin tips and best practices
- Winshuttle recommends creating a specific form view for your form in which everything can be captured. For example, if you have a Developer View or PostProcessView, consider using one of them. See Working with Views for more information.
Copy Form plugin parameters table
NOTE: For site and list parameters, enter the site first, and then the list will be populated in the dropdown.
Property |
Description |
|
file |
The full file system path in which you would like to place the copied file into. |
|
folder |
The name of the SharePoint Document Library/List Folder to copy the form to. |
|
list |
The SharePoint Document Library to which the copied form will be delivered to. |
|
name |
Name or Title to give the copied form when placed inside the new destination. You can use a form field or a SharePoint column for this value. NOTE: All forms are saved as .MHT files. The form name can be a static string or the value of one or more SharePoint fields. You can also include [$Process.Id] and/or [$Assignment.Id] data. |
|
site |
The link of the SharePoint Site that holds the SharePoint Document Library/List. (This is not the direct link to your SharePoint Document Library/List.) |
|
view |
The name of the Form View in which you would like to copy. It is recommended that you create a specific for view for this so everything can be captured. If you have a Developers View or a Ws.PostProcessView, it is recommended you use that. |