Applies to:
- Winshuttle Foundation
Repeating Table
A repeating table contains other controls in a table format. Users can insert multiple rows when filling out the form.
For example, if you have a purchase request form, you may only need to display a single table row (Item description, quantity, price, sub-total) on the form, but you'll probably want your users to be able to add additional rows as they fill out the form.
Note: You can also 'nest' repeating tables within one another by dragging a Repeating Table Element onto an existing Repeating Table, and then specifying the number of columns for the nested table, and the number of columns for the nested table to span (i.e. the width/size for the nested table within the parent table).
Make sure of the following when working with repeating groups or repeating tables
When working with Repeatingelements of any type (i.e. Repeating Groups and/or Repeating Tables) within a Web Service (or elsewhere), make sure of the following:
- Any field within a Repeating Content folder within the Form Data tree is also in the form within a repeating container.
- All non-repeating fields in the Form Data tree are non-repeating in the form.
Failure to follow the above guidelines may result in unintended behavior while working with repeating elements when running a Web Service.
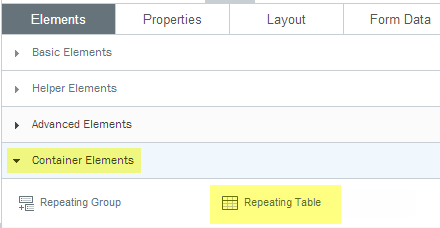
Add a repeating table to a form
- In the canvas, click the group to which you want to add a table.
- In the Properties pane, click the Elements tab.
- Click Container Elements.
- Click Repeating Table.
- In the New Repeating Table dialog box, type the number of columns you want, and then click OK.
Tip for querying a SQL data source: Case matters.
If you are querying a SQL data source and then want to insert results into a selectable or repeating table, make sure that your query text matches the case of the SQL columns.
For example, if a column in the SQL database is COLUMN_1, then the Query will not work if it is querying column_1.
Composer Repeating Table element properties
Name: The table ID in the form.
Read-only: Sets the group to read only (true) or not read only (false).
Column Span: The number of columns the group will span.
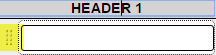
Show Header: Set to true to show the header for the column.
New Item Location: The location of the '(+) Add new item
![]()
Enable Search: Enable or disable a search box for searching or filtering information in a table.
- True: Enables a Search box for the form user to enter search/filter criteria.

- False: Hides the Search box.
Enable Sort
- True: Shows sorting arrows for the fields in a table to enable users to quickly sort data.

- False: Hides sorting arrows.
Enable Excel Operations: When set to True, this displays available Excel operations to the form user (Export and Upload to Excel) so data can be uploaded to an Excel file on the form user's local PC.
- Export outputs the contents of a repeating table or group to an Excel file.
- Upload uploads the data into an Excel file.
Excel Upload Options: Displays the following available upload options (as radio button selectors) for the form user at run-time:
- Replace: This will replace the entire contents of the table or group.
- Update: This will update each row/field while preserving any additional rows already within the table or group.
- Append: This will preserve all existing rows and append the new content to the end of the table or group.
Enforce Row Count on Excel Upload: (True/False): Set to True, this option checks that the uploaded file contains the same number of rows as the Repeating Table. If there is a mismatch, the Excel upload will be denied. This can be used to restrict new rows from being added or deleted from the Repeating Table when it is uploaded to Excel.
Enable Validation Results: Displays the Validation link to the user. Clicking Validation will display the number of validation errors found in the Repeating Table/Group. This is typically used with the Paginate Content (see below) property to find validation errors in large tables.
Default Row Count: The number of empty rows created when the form is loaded.
Row count: Lets you specify the number of rows before paginating content.
Paginate content: Set to True, content in the table will be displayed in a single page. Set to False, content will be paginated according to the Row Count setting.
Row Number Field: Select a field to use as the row number for the table.
Row Options icon: (Left or Right) -- Where to place the row options icon in a row in a selectable table (see below).
Group Styles
- Border Width: The width in pixels of the border around the group.
- Border Style: The style of the border--dashed, dotted, solid, etc.
- Border Color: The color of the border.
- Table Width: The width (in pixels) for the table. The default value (0) enables to the table to dynamically resize with the browser (responsive design).
Advanced Options
Key Column for Merging
This dropdown will contain a list of all fields contained in the Repeating Table/Group. Setting this 'key' will cause the form to perform a merge each time the table data gets updated, but only fields that are actually changed by the user are updated.
The value of the key should be the name of one of the table columns . Each row must have a unique key value. The key value indicates which column contains the key (for example, my:partnumber).
Payload Store Type
This idea behind this property is to store the repeating content outside of the formXML. If you are working in an environment where an external data store has been configured to offload part of your form data, the values in this dropdown let you specify which 'store' to use. (This would need to be configured by your Winshuttle Workflow Administrator.)
When the form is loaded, the formXML will be populated with the “store” content so at run-time it will look identical. Setting this property to “Default” will enable the global Server config property ‘PayloadStoreType’ to indicate which store to use when saving the Repeating Content.
PayloadStoreType settings
1 Attachment Store
This is the default store if PayloadStoreType is not specified. The external tables are stored as attachments on the list item.
2 File Store
The external tables are stored on a network file system. Use the global config value ‘FileSystemPayloadStoreFolder’ to provide a UNC path to the file system. You can also append _<ListName> to create a list specific setting (e.g., ‘FileSystemPayloadStoreFolder_MyTestForm’). The SVAdmin account must have read/write access to this folder.
3 Database Blob Store
The external tables are as blobs in an SQL database. Use the following script to create the necessary table and indices:
SET ANSI_NULLS ON
GO
SET QUOTED_IDENTIFIER ON
GO
CREATE TABLE [dbo].[Payloads](
	[PayLoadID] [uniqueidentifier] NOT NULL,
	[WebGuid] [uniqueidentifier] NOT NULL,
	[ListGuid] [uniqueidentifier] NOT NULL,
	[ItemID] [int] NOT NULL,
	[Binding] [nvarchar](50) NOT NULL,
	[Payload] [nvarchar](max) NOT NULL,
	[LastUpdate] [datetime] NOT NULL,
 CONSTRAINT [PK_Payloads] PRIMARY KEY CLUSTERED
(
	[PayLoadID] ASC
)WITH (PAD_INDEX  = OFF, STATISTICS_NORECOMPUTE  = OFF, IGNORE_DUP_KEY = OFF, ALLOW_ROW_LOCKS  = ON, ALLOW_PAGE_LOCKS  = ON) ON [PRIMARY]
) ON [PRIMARY]
GO
ALTER TABLE [dbo].[Payloads] ADD  CONSTRAINT [DF_Payloads_PayLoadID]  DEFAULT (newid()) FOR [PayLoadID]
GO
ALTER TABLE [dbo].[Payloads] ADD  CONSTRAINT [DF_Payloads_LastUpdate]  DEFAULT (getdate()) FOR [LastUpdate]
GO
CREATE NONCLUSTERED INDEX [IX_Payloads] ON [dbo].[Payloads]
(
	[WebGuid] ASC,
	[ListGuid] ASC,
	[ItemID] ASC
)WITH (PAD_INDEX  = OFF, STATISTICS_NORECOMPUTE  = OFF, SORT_IN_TEMPDB = OFF, IGNORE_DUP_KEY = OFF, DROP_EXISTING = OFF, ONLINE = OFF, ALLOW_ROW_LOCKS  = ON, ALLOW_PAGE_LOCKS  = ON) ON [PRIMARY]
GO
The table can be added to the Workflow Database or to some other database. In the latter case you can specify a connection string with the global config value ‘SqlConnectionPayloadStore’. You can also append _<ListName> to create a list specific setting.
4 Database Table Store
The external tables are disassembled and stored as individual records in an SQL database. Use the following script to create the necessary table and indices:
SET ANSI_NULLS ON
GO
SET QUOTED_IDENTIFIER ON
GO
CREATE TABLE [dbo].[PayloadTables](
	[Id] [uniqueidentifier] NOT NULL,
	[ParentId] [uniqueidentifier] NOT NULL,
	[Ordinal] [int] NOT NULL,
	[Binding] [nvarchar](50) NULL,>
	[Value] [nvarchar](100) NULL,
	[PayloadLockID] [int] NULL,
 CONSTRAINT [PK_PayloadTables] PRIMARY KEY CLUSTERED
 (
	[Id] ASC
)WITH (PAD_INDEX  = OFF, STATISTICS_NORECOMPUTE  = OFF, IGNORE_DUP_KEY = OFF, ALLOW_ROW_LOCKS  = ON, ALLOW_PAGE_LOCKS  = ON) ON [PRIMARY]
) ON [PRIMARY]
GO
CREATE NONCLUSTERED INDEX [IX_PayloadTables] ON [dbo].[PayloadTables]
(
	[ParentId] ASC,
	[Ordinal] ASC,
	[Binding] ASC
)WITH (PAD_INDEX  = OFF, STATISTICS_NORECOMPUTE  = OFF, SORT_IN_TEMPDB = OFF, IGNORE_DUP_KEY = OFF, DROP_EXISTING = OFF, ONLINE = OFF, ALLOW_ROW_LOCKS  = ON, ALLOW_PAGE_LOCKS  = ON) ON [PRIMARY]
 GO
The table can be added to the Workflow Database or to some other database. In the latter case you can specify a connection string with the global config value ‘SqlConnectionFormXmlDB’. You can also append _<ListName> to crreate a list specific setting (e.g., ‘PayloadStoreType_MyTestForm’).