Step 4: Modify the Web.Config file
Back to
Server 10.5/10.6 installation
- Install Erlang and RabbitMQ
- Install Winshuttle Server Manager
- Install the Queue Manager
- Modify the Web.Config file
- Install Server Worker
- (Optional): Configure Winshuttle Central for Server Autopost
Related topics
After installing RabbitMQ, the instance is bound to the Manager, but you need to define this binding in the Web.Config file for Winshuttle Server. In addition, if you plan to use Winshuttle Server’s AutoPostService and MetaService services, you need to add the Domain account names that will use the services to the Web.Config file.
Common clients (domain service accounts) include the following:
- To communicate with Winshuttle Central: The User Identity is the IIS Application Pool Identity under which the Winshuttle Central site is running.
- To run scheduled jobs through Run Later (Server): The client identity is the identity under which SharePoint Timer service is running.
- If a third party client is directly using either of the above: The client identity is the Windows identity under which the client application is running.
The recommended way to modify the Web.Config file is to use the Winshuttle Server Administration Utility, which by default can be found in the following path\folder:
C:\Program Files\Winshuttle\Server\Tools\Administration\Administration.exe
To modify the Web.Config file with the Winshuttle Server Administration Utility, do the following:
- Backup the current Web.Config file to a safe location.
- Run C:\Program Files\Winshuttle\Server\Tools\Administration\Administration.exe.
- Browse to the Web.config file.
- Click Load Configuration.
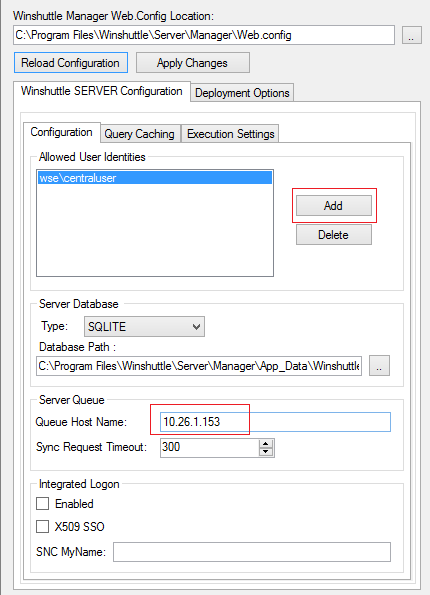
- After the configuration file is loaded, add the client identities (domain/username) and then define the Queue host IP address or FQDN (Fully Qualified Domain Name). (See screenshot below.)
NOTE: You will need 1 or 2 client identities: one identity that is running the application pool of the SharePoint Web application that the Winshuttle products function in, and one identity that is running the SharePoint Timer Service if it is running under an identity different from the one running the application pool.
- Click Apply Changes to save your changes and close the utility.
