Applies to:
- Winshuttle Foundation
3-3. Create Swim Lanes, participant resolvers, and workflow
Back to
Steps in this phase
In this step we will create the basic workflow with Swim Lanes and participant resolvers for the Originator, Accounting, Purchasing, and MasterData participants.
Before creating Swim Lanes and assigning participants, you will need to be connected to your SharePoint list where the solution will be published. This is the site from which users and groups of users will be selected and assigned to Swim Lanes. See Adding data connections in the Composer help center for instructions on connecting to SharePoint and other data sources.
To add a Swim Lane:
- In Composer, click the Workflow tab.
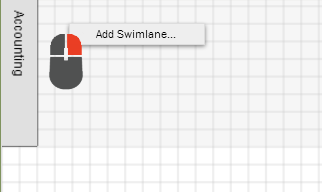
- Right-click in the canvas, and then click Add Swim Lane.
- In the New Swim Lane Wizard:
Type: Select Person from Role.
Role: Select the role appropriate to your environment.(The items in this drop-down list will be specific to your environment and based upon the data connection you are using to get the information.)
Name: Type the name for the Swim Lane (Accounting, for example).
TIP: For each Swim Lane in our case, we will use the PersonFromRole participant resolver. In the PersonFromRole resolver, you specify a SharePoint group from which you can pick the participants. The participant can be selected when you design the form by specifying the name in the User field, or the participant can be selected at run time (via the form’s Process Control). In this case, we will use the run-time selection for all the Swim Lanes.

Repeat the steps in this section to create/add Swim Lanes so there is a Swim Lane for the following groups:
- Originator
- Accounting
- Purchasing
- MasterData
Adding workflow activities to Swim Lanes
With the Swim Lanes in place, we can add workflow Activities for participants.
- On the Workflow tab, click Activity.
- Draw 1 Activity in the Accounting Swim Lane.
- Draw 1 Activity in the Purchasing Swim Lane.
- On the Workflow tab, click Approval.
- Draw 1 Approval in the MasterData Swim Lane.
- Click the center of a node, and then draw a transition (the arrow between nodes) to the next activity.
See Working with nodes and Working with transitions for more information.
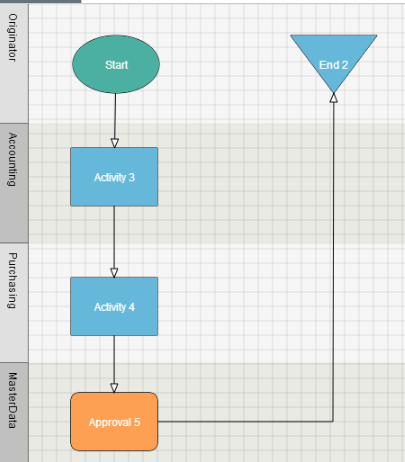
The end result should look something like this: